Thursday, March 29, 2012

HOW TO COOK SPAGHETTI SQUASH


                                   You won't believe how easy this is!


     Last week I bought a spaghetti squash in order to try another recipe from the 17 day diet.  I've been kind of putting it off, afraid it wouldn't turn out right or I wouldn't like it.  SURPRISE!!!  It was GREAT!!! So, I'm recommending it to you.  Just think of all the carbs you'll save by substituting this for your favorite pasta!  (Or at least you can eat a few bites of dessert because you skimped on the pasta.)  This is so simple to fix - just slice in half, scoop out the pulp, and microwave about a an inch of water in a class dish for 8 minutes!  C'mon - I'll show ya!

Ingredients:
  • 1 spaghetti squash
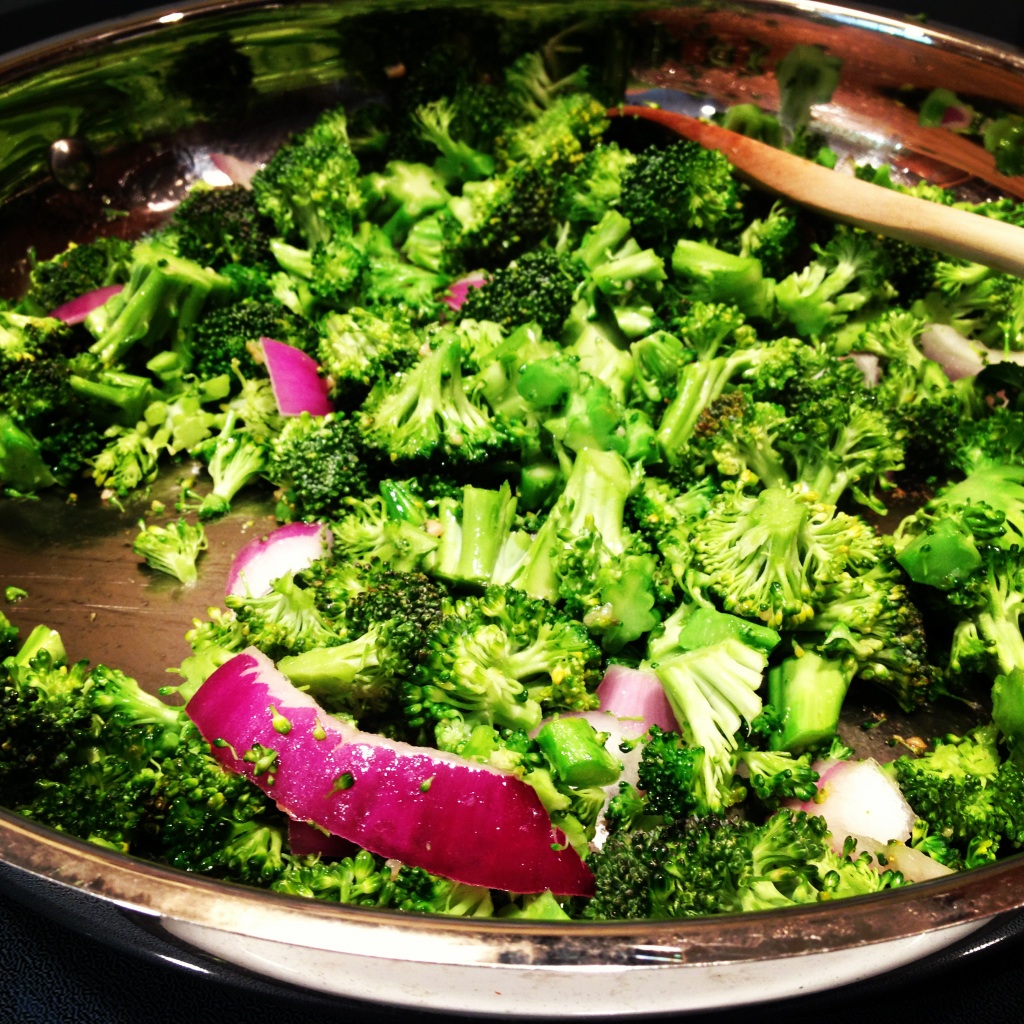
  • 2 cups chopped, fresh broccoli
  • 1 small onion, diced
  • 2 diced garlic cloves
  • 1 Tbsp. olive oil
  • 1 jar low carb marinara sauce
Directions:
  1. Cut squash in half lengthwise.  Scoop out the seeds and pulp.
  2. Place in glass baking dish with about 1/2 inch water, rind side up.
  3. Microwave 8-10 minutes per half on high (you can also bake at 375 degrees 40-45 minutes).
  4. Meanwhile, in a medium frying pan, saute broccoli, onion, and garlic in oil until vegetables are crisp and tender.
  5. When squash is done, let stand for a few minutes to cool.  Separate strands by running a fork through from top to bottom.  This is how you get it to look like spaghetti!  Place strands in a separate bowl.
  6. When vegetables are sauteed, add squash, mix together and  heat through.
  7. Warm the marinara sauce in microwave.
  8. Serve vegetable mix with marinara sauce on top. 
Makes 4 servings.  My family was very happy with this recipe.  The only thing I'd do different is probably add some salt, and I'd also use my own spaghetti sauce recipe (hint, hint;).
Sautee broccoli, garlic and onion in oil


Add spaghetti squash


Tada!!!  Looks just like spaghetti!  Yummy!
                                        

Sunday, March 25, 2012

CHOCOLATE COVERED CHEESECAKE BITES


     I decided to whip up this new-to-me recipe yesterday, and I didn't take into account the fact that the cheesecake is supposed to freeze overnight before dipping it into the chocolate.  Here's a tip:  ALWAYS read your recipe completely through before announcing to your family that you're going to make it.  If it's something they're really looking forward to, you  may be the recipient of a few dirty looks and muttered comments when you tell them, "Oh, sorry, you'll have to wait 'till tomorrow to eat those"!

     I decided not to freeze them overnight after that episode.  I just popped them in the freezer for a couple hours and then dipped them in chocolate.  There was no epic fail with this except that they fell apart when cutting...and dipping - just a bit.  So when you're ready to serve these, make sure you make them up a day ahead of dipping.  It'll save a little frustration. Plus, when you do things ahead of time it's always nice because you don't have to spend a lot of time per day on either step!

Crust Ingredients:
  • 1 cup graham cracker crumbs
  • 1/4 cup finely chopped pecans
  • 1/4 cup butter, melted
Filling Ingredients:
  • 2 packages (8 ounces each) cream cheese, softened
  • 1/2 cup sugar
  • 1/4 cup sour cream
  • 2 eggs, lightly beaten
  • 1/2 tsp. vanilla extract
Coating Ingredients:
  • 24 oz. semisweet chocolate, chopped (we used Ghiradelli dark from Sam's - YUM!)
  • 3 Tbsp. shortening
Directions:
  1. Line a 9-in. square baking pan with foil and spray with cooking spray, heat oven at 325.
  2. In small bowl, combine crust ingredients: graham cracker crumbs, pecans and butter.  Press into prepared pan, set aside.
  3. In a large bowl, beat filling ingredients: the cream cheese, sugar and sour cream until smooth.  Add eggs; beat on low speed just until combined.  Stir in vanilla. 
  4. Pour mixture over crust.
  5. Bake at 325 for 35-40 minutes or until center is almost set.  Cool on a wire rack.  Refrigerate until chilled.
  6. FREEZE OVERNIGHT.
  7. The next day, melt coating ingredients: chocolate and shortening in microwave (do this 1 minute at a time, stirring after each.  It may take up to 5 minutes to get chips fully melted).
  8. Set out a cutting board, place atop cheesecake, and invert. Remove foil gently; cut into 49 squares (that's 7 rows each side).  Remove a few pieces at a time for dipping; keep remaining squares refrigerated until ready to dip.
  9. Using a toothpick, completely dip squares, one at a time, in melted chocolate;, allow excess to drip off.  This can get messy.
  10. Place on waxed paper-lined sheets; spoon about 1 tsp. chocolate over each (because when you take the toothpick out, it leaves an uncovered hole).
  11. Let stand for 20 minutes or until set.  Store in airtight container in the refrigerator or freezer, whichever you prefer.  
Here's a few pics of the whole process:

Cutting the cheesecake squares
                                                        Dipping the squares - this is the fun part!


It's a little messy - my girls enjoyed eating the extra chocolate :)
This is a fun project for all ages!!!

Linked to:  http://www.bedifferentactnormal.com/2012/04/show-and-tell-saturday-040712.html

Friday, March 23, 2012

PINK LEMONADE POUND CAKE


                         Ok, it's a bit lopsided but LOOK at the moistness!!!

     It's birthday season at my house.  Last week my oldest turned 23, this week my middle turned 18.  At the end of the month, my husband turns - well he's still in his 40's, and in May my other two children each have a birthday one day apart (ages 21 and 16).  This stresses me out.  I have no idea why I didn't space them more evenly around the year, but at least we get it all overwith in the spring.

    Recently I pinned this cake to "my favorite recipes" board on Pinterest, and my daughter saw it and asked for it for her birthday cake.  No problem. Rigggghhhhtttt.

     This cake is a tad bit on the tricky side because of the part where you don't remove it from the pan until it has soaked in a glaze and then cooled.  This made the removal of said cake a near tragedy, thus - the lopsided version you see here. 

     I could have swept this under the rug to be our little family secret, but I wanted you to know that even after 25 years of cooking for my family, there are still flops.  That's supposed to encourage you.
And it wasn't a total flop, it was the most amazingly moist cake I've ever tasted and it had a great lemon flavor to it!

     Ingredients:
  • 1 package lemon cake mix
  • 1-3 oz. package instant lemon pudding mix
  • 4 eggs
  • 1/3 cup vegetable oil
  • 1/2 cup milk
  • 1 can pink lemonade concentrate
  • pink or red food coloring
  • 1/2 cup granulated sugar
  • 1/4 cup butter
  • 2 cups powdered sugar
  • 2 Tbsp. milk
  • 1/2 tsp. vanilla
Directions:
  1. Preheat oven to 350 degrees.  Grease and flour bundt pan. Grease GENEROUSLY!!!
  2. Combine cake mix, lemon pudding mix, eggs, vegetable oil, 1/2 cup milk, and 1/2 cup pink lemonade concentrate.
  3. Mix in 1/2 to 1 tsp. red or pink food coloring.
  4. Pour batter into prepared pan and bake for 50 minutes to an hour.
  5. During last 10 minutes of baking, prepare glaze (see directions below).
  6. Remove from oven and prick cake all over with a fork (you're pricking the bottom of the cake - it's still in the pan).
  7. Immediately pour glaze over the pricks.
  8. Let cake stand in pan until almost cool.
  9. Remove cake from pan and drizzle with lemonade glaze.
                                         Now we have a problem.....

                                         That's...a little better...
Glaze (for bottom of cake, pouring over pricks):
1 cup pink lemonade concentrate
1/2 cup granulated sugar
Mix together with fork, don't let it set too long or it will start to harden.

Pink Lemonade Glaze (for top of cake):
1/4 cup melted butter
2 cups powdered sugar
2 Tbsp. milk
1/2 tsp. vanilla
pink or red food coloring - 1/2 tsp.
Mix all together and drizzle over cake.

Now the moral of the story is:  grease excessively (and flour), and just be careful.  I probably didn't grease the pan enough, which is a common mistake. 

We have been LOVING this cake so much I can't stay out of it, that moistness is just divine!!!

CROCK POT ROTISSERIE CHICKEN


     Trust me, the picture doesn't do it justice.  It literally is so moist it falls off the bone and the taste is so good! 

      You literally use two things for this easy, simple, tasty dinner:

      Rub in 1 Tbsp. olive oil.  Get underneath the skin as well as on top.
      Rub in 2 Tbsp. McCormack Rotosserie Chicken Seasoning the same way.
      Cook on low 6-7 hours.

THAT'S IT!!!!  Little time, HUGE benefits!!!!  Bring on the chicken!

Serves 6

Saturday, March 17, 2012

MINI MAPLE PANCAKE MUFFINS


                                                      (WITH CHOCOLATE CHIPS!)


     My newest favorite blog is http://www.sixsistersstuff.com/ and they have some incredible stuff!  That's where I got this recipe and just had to try this new spin on pancakes!  Plus, my daughter asked last night if I'd make her pancakes in the morning and I said, "No, but I'll make some mini pancake muffins!"  She was good with that.  After breakfast, she was GREAT with it!

Ingredients:
  • 1 cup flour
  • 1 teaspoon baking powder
  • 1/2 teaspoon baking soda
  • 1/4 teaspoon salt
  • 2 tablespoons sugar
  • 2/3 cup buttermilk (I used 3/4 cup regular milk + 1 tsp. lemon juice.  You can use 1 tsp. of vinegar too.  My grandmother taught me that trick! However, I'm sure real buttermilk makes it taste better, but I never have real buttermilk on hand and I'm sure not going to buy some just for 3/4 cups in a recipe.)
  • 1 egg
  • 2 tablespoons pure maple syrup (I used Log cabin maple - it's what I had on hand).
  • 2 tablespoons melted butter
  • 1/2 cup milk chocolate chips
Directions:

  1. Generously grease a 24 cup mini muffin pan with non-stick spray. Preheat oven to 350 degrees.
  2. Combine flour, baking powder, baking soda, salt and sugar in a medium bowl. Sift together with a wire whisk.
  3. In another bowl, stir buttermilk, egg, maple syrup and melted butter until just combined.
  4. Add wet ingredients to dry ingredients and stir with a spoon until combined.
  5. Stir in chocolate chips. Reserve a few chips to sprinkle on the tops.
  6. Bake for 8-9 minutes (May take a bit longer.  These muffin cups were VERY full!)

    Makes 24 mini pancake muffins. Serve with butter or syrup (we used butter AND syrup - just like pancakes).

    I used mini muffin liners and the muffins were hard to get out.  But Paula Deen says you can spray them lightly with cooking spray, so I'll try that next time! Also, I didn't have a mini muffin pan but I still just sat the muffin liners in regular muffin pans and that worked just fine. However, before I discovered the tiny liners in my cabinet, I was going to use regular muffins and just bake them longer.  Don't let pesky details hold you back!   

Wednesday, March 14, 2012

Paula Deen's Orange Glazed Breakfast Rolls


     Here's a quick and yummy trick for a scrumptious breakfast that looks like you put a lot of time into it (but you really didn't)!   My daughter Kylie and I saw this on the Paula Dean Show last week!

Ingredients:

  • 1 Can Grands biscuits
  • 1/2 cup sugar
  • 1/2 tsp. Orange zest (I just scraped some peel off an orange "cutie" with a serrated knife - see, it doesn't have to be hard, use what you have!)
  • 1/4 to 1/2 cup coarsley chopped walnuts or pecans
  • 2 oz. cream cheese
  • 2 Tbsp. orange juice
  • 1/2 cup powdered sugar
  • Margarine or butter to brush on biscuits

Directions:

1. Preheat oven to 350 degrees
2. Spray a round cake pan with cooking spray.
3. Place one grand in center of greased cake pan.
4. Cut rest of Grands in half, arranging in a flower pattern around whole biscuit. Use entire pack (they will be crowded - that's ok!)


5. Brush biscuits with margarine.
6. Mix orange zest, 1/2 cup granulated sugar, and nuts, and sprinkle atop biscuits.
7. Bake 20-22 minutes.
8. While rolls are baking, mix cream cheese, orange juice, and powdered sugar until lumps are   gone. You may use a mixer - I just used a whisk and beat vigorously.
9. When rolls are done, drizzle cream cheese mixture atop rolls and serve.


Serves 8 - watch 'em disappear!


Monday, March 12, 2012

CHEESEBURGER CASSEROLE

CHEESEBURGER CASSEROLE
     One of my son's favorites, it has all the tastes of a cheeseburger mixed in, including the ketchup and mustard!  The secret to the crispiness on top is broiling for 2 minutes at the end.  Just keep the pan on the same middle rack. 

Ingredients:
  • 16 oz. spiral macaroni
  • 1 1/2 cups cheddar cheese
  • 1 lb. ground turkey or beef
  • minced or chopped onion (if desired)
  • 4 Tbsp.  margerine
  • 2 Tbsp. flour
  • 1 cup milk
  • 1/2 bag Ritz crackers
  • 1 Tbsp. ketchup
  • 2 tsp. mustard
Directions:

  1. Boil macaroni according to directions.
  2. Meanwhile, brown turkey or beef, drain, and add ketchup and mustard.
  3. Melt 2 Tbsp. butter over med/low heat and stir in flour with whisk, 1 tablespoon at a time. 
  4. Gradually stir in cup of milk, just a bit at a time, to avoid lumps.
  5. Add cheese and turn heat down to low, stir about 5 more minutes.
  6. Drain macaroni and mix with cheese mixture.
  7. Place meat mixture in 9x13 pan sprayed with cooking spray.
  8. Top with cheesy macaroni.
  9. Melt the other 2 Tbsp. butter and crush crackers.  Mix together and sprinkle over macaroni.
  10. Bake in 375 degree oven for 15 minutes, turn oven to broil; broil 2 minutes or until crackers are browned. 
     Serves 6-8, but be prepeared for second helpings and ZERO left overs!!!  Soooo good!


GRILLED CHICKEN QUESADILLA

GRILLED CHICKEN QUESADILLA


     We had these for lunch today and boy, were they a hit!  My daughter took one to work for my future son-in-law and he declared it "one of the best things" he ever tasted.  Good enough for me - let's put it in the blog!

Ingredients:

  • Texas Toast Bread
  • Green pepper
  • Onion
  • 3 chicken breasts or 7 frozen chicken tenderloins (that's what I used)
  • 1 pckg. 4 cheese Mexican shredded cheese
  • Cumin, chili powder, salt (if desired)
  • Spreadable margerine

Directions:

  1. Slice onion and green pepper lengthwise.  I used about 1/4 cup onion and 1/2 pepper.
  2. Brown chicken, onion and pepper in skillet using light cooking spray or a bit of butter.  Sprinkle a bit of cumin and salt on chicken.
  3. Remove all from pan and cut chicken into small pieces.
  4. Using same pan, assemble and grill sandwiches with peppers, onions, and chicken. Butter outside of bread, adding a sprinkle of chili powder.  Add cheese to the mixture, grill until done.
     Makes enough for 6 sandwiches.  Let me know if you try it!


Sunday, March 11, 2012

OREO COOKIES

                                                 
                                                      KYLIE'S OREO COOKIES                


     Kylie put her apron on today and made these up for us really quick.  Two steps:

1.  Take a layer of pre made cookie dough and cover oreos.
2.  Bake at 350 for 11-14 minutes.

     If you want, you can trim around the cookie like she did in order to make it look a bit neater.

     We LOVED these.

     And we ate them all.

     So next time you need chocolate FAST, try these!

Saturday, March 10, 2012

SEASONED RICE (or brown rice)


     The night I made Taco Chicken (it's on the web site), I searched Allrecipes for a flavorful, yet easy, rice side dish using brown rice. I searched "Brown Rice" (because that's what I had) and got a recipe that called for white, long grain rice (even though the recipe was called "Brown Rice").  It called for a can of beef broth; I had steak seasoning.  The recipe also called for a 10.5 oz. can of condensed french onion soup - I had Lipton dried onion.  The two things I did have were Worchestershire sauce, dried basil, and 1/4 cup butter.  As usual, I improvised. 

It's what I do.  Mom of four = improvisor.  After all, when are you EVER fully prepared for everything as a mother of that many children going in all different directions?!? 

Flexibility is the mother of invention.  No wait...that's just my philosphy.

Here's what I did:  I used my quick brown rice, 1 tsp. steak seasoning, dried french onion soup, water, worchester, and a teeny bit of basil (because there was already some in my steak seasoning). 

14 oz. canned broth + 10.5 oz. canned onion soup (both ingredients which I did not have = oh let's add a little over 1 pint of water, say 2 1/2 cups.  (1 pint = 16 oz. or two cups just in case you forgot, I still have to remind myself sometimes.)  Turns out, I probably only needed right at 1 pint because the rice turned out a tad bit watery.

The rice was to be baked at 350 for an hour, which meant this was not quick rice we were dealing with.  So, I baked it for 30-40 minutes.  (I say that because I can't remember the exact time, I kept checking the chicken and resetting the timer.)

The result?  Everyone LOVED it!!!  They asked why I'd never made it before.  Definitely a keeper.

I say all that to say this:  don't let a few pesky ingredients hold you back.  Be creative, be flexible, make a decision, go with it.

Now.  I'll give you my version, and their version. You can decide for yourself which one you like.

 
RUTHIE'S SEASONED RICE

Ingredients:
  • 1 1/2 cups brown quick rice
  • 1 tsp. steak seasoning
  • 1 package dried onion soup
  • 1/4 cup melted butter
  • 1 Tbsp. Worchestershire sauce
  • sprinkle of dried basil leaves
  • 2 cups water, heated in microwave 1:30 minutes.
Directions:
  1. Preheat oven to 350 degrees.
  2. Combine steak seasoning and onion soup in water.
  3. Combine all ingredients in 2 qt. casserole dish.
  4. Cover and bake 30-40 minutes.

ALL RECIPE'S SEASONED RICE

Ingredients:
  •  1 1/2 cups uncooked long grain white rice
  • 1 14 oz. can beef broth
  • 1 10.5 oz. can condensed french onion soup
  • 1/4 cup melted butter
  • 1 Tbsp. Worchestershire sauce
  • 1 Tbsp. dried basil leaves
Directions:
  1. Preheat oven to 350 degrees.
  2. In a 2 quart casserole dish combine rice, broth, soup, butter, Worcestershire sauce and basil.
  3. Bake covered for 1 hour, stirring once after 30 minutes.
Serves 6-8 - let me know which one you prefer!

Tuesday, March 6, 2012

CAKE BATTER CHOC CHIP CREAM CHEESE COOKIES


                                                   Say that five times fast!!!

     My daughter is trying to upstage me by making these fabulous cookies.  Just look at them - how could I not post the recipe???  So, for your enjoyment (and oh, how you WILL enjoy them):  Hayley's cake batter chocolate chip cookies - WITH Ghirardelli chocolate chips.  Now, you can use any kind of chocolate chips, and any kind of cake batter, but those were her chips of choice, and she went with a yellow batter.  Way to go, Hayley! You're trying to be my favorite child, aren't you?

Ingredients:

  • 1 box yellow cake mix (or other cake mix of your choice)
  • 8 oz cream cheese, room temperature
  • 1/4 cup butter, room temperature
  • 1 large egg
  • 1 tsp. vanilla
  • 12 oz. bag semi- sweet chocolate chips (or 1 cup any other add-in you like, such as flavored candy, nuts, etc.)

Directions:

  1. Preheat oven to 375 degrees.
  2. Cream together butter and cream cheese. 
  3. Add egg and vanilla and mix until well blended.
  4. Stir in cake mix a little at a time until it's all blended.
  5. Stir in chocolate chips (or nuts or candy of your choice).
  6. Bake 10 minutes, until edges are brown.
And that's it!  It so perfectly qualifies for the Kozi Kitchen because of it's simplicity, yet yumminess.  Hayley, you are getting an A in Home Ec this year.  Oh wait, I give you an A in that every year - even on the years when we don't count all our work at home as "Home Ec"!  (Homeschool humor, bear with me!)

Makes about 4 dozen

Monday, March 5, 2012

TACO CHICKEN


     Get out your gallon ziplock baggie and get ready to marinade!  This flavorful chicken needs to sit in the flavors for a few hours, then either grill (or pan sear and bake).  Everyone at my table was delighted with this new recipe from Steph at Plain Chicken http://www.plainchicken.com/2011/05/taco-chicken.html!

Ingredients:

  • 2 Tbsp taco seasoning mix (from 1-oz package)
  •  1 tsp dried oregano leaves
  • 2 Tbsp olive oil
  • 1/2 cup salsa
  • 1/2 teaspoon ground cumin
  • 4 boneless skinless chicken breasts (about 1 1/4 lb) (I used thawed chicken tenderloins).
  • 1/4 cup barbecue sauce
  • 2 Tbsp chili sauce (I used 1/8 tsp. chili powder and mixed in with above ingredients).
                                                   INGREDIENTS

Directions:
  1. Combine first 5 ingredients. Pour over chicken and let chicken marinate in the refrigerator for several hours or all day.
  2. Combine barbecue and chili sauce (if you haven't already used chili powder with your first 5 ingredients like I did). Set aside.
  3. Place chicken on grill; cook 10 to 15 minutes, until done. Baste chicken with barbecue sauce mixture once on each side before removing from grill (during the last few minutes of grilling).
*If you don't want to grill the chicken - Pan sear the chicken for 2-3 minutes on each side and then bake at 400 for about 10 minutes, basting with the bbq mixture.* (That's what I did, and it worked beautifully!  Plus, I learned how to pan sear - I'll leave you the directions!)
*Pan-searing uses high heat to seal in juices by forming a delicious crust. The key to pan-searing is making sure the pan is hot enough. To test a pan for readiness, sprinkle a drop of water onto the pan; the water should sizzle or jump around. Remove the pan from the heat, and add a small amount of butter or oil to lightly coat the surface. The butter or oil should be heated through, but should not burn. Add the food to be pan-seared; do not move it until a crust has formed. Use a spatula to turn the food; be sure not to tear the crust.
     So now you (and I) know how to pan sear - we are official now, guys!!!

NACHO POTATO SOUP


                                                 NACHO POTATO SOUP

     I love this soup, it it can be made so quickly and hits the spot on a cold (and snowy) winter day!  If you have a box of au gratin potatos on hand, along with a can of corn and a can of diced tomatoes with green chilis, you're set!

Ingredients:

  • 1 box au grautin potatos
  • 1 can diced tomatoes with green chilis
  • 1  can corn, drained
  • 2 cups water
  • 2 cups milk
  • 2 cups cheddar cheese, american cheese, or any other kind you have on hand.
Directions:

  1. In saucepan, combine au gratin ingredients, corn, tomatoes, and water, mix well.
  2. Bring to a boil, reduce heat; cover and simmer 15-18 minutes or until potatoes are tender.
  3. Add milk and cheese.  If you have hot pepper sauce on hand, you can add a few drops if desired.
  4. Cook and stir until cheese is melted. Garnish with parsley if desired.
Serves 6-8

Saturday, March 3, 2012

ITALIAN SPINACH SALAD


                                                        ITALIAN SPINACH SALAD

     Here we have the perfect accent to our spaghetti dinner tonight.  Toss some fresh veggies together and a few spritzes of dressing made with red wine vinegar and olive oil and voila! Something to make the tastebuds dance!

Ingredients:

  • 6 cups torn spinach
  • 1/4 red onion, thinly sliced lengthwise
  • 1 1/2 cups cherry tomatoes
  • 1/2 cup diced fresh mozzerella cheese (not like the bag of cheese you use on pizza) 
Toss together in large bowl mix together the following ingredients for dressing:

  • 3/4 cup red wine vinegar
  • 3/4 cup olive oil
  • 1 garlic clove, minced (I use a squeeze bottle of garlic - 1 tsp.)
  • 1 tsp. sat
  • 1/4 tsp. pepper
  • 1/4 tsp. dried basil
Whisk ingredients together, chill a few minutes if possible, and spritz or drizzle 1/2 cup over spinach mixture. Serve immediately. (Can add black olives, if desired.)

Serves 8

PEPPERONI ROLLS

                 
                                                              PEPPERONI ROLLS

     I used to shy away from trying anything like this because it involved bread, and back in the day, bread and I didn't get along.  I mean as far as cooking goes.  I just wasn't fond of the whole kneeding, rolling, sticky process and usually I ended up killing my yeast in the process.  Trial and error are the best teachers, and I no longer am afraid to take on the bread recipes.  However, you don't have to worry about all that kneeding or yeast or anything with this recipe, because we use - wait for it - FROZEN ROLLS.  Yep, get over the guilt, go ahead and buy a bag and get on with your life!

     Years ago my cousin Brenda decided to take on the daunting task of compiling a cook book comprised of recipes from the Morris family.  I had inherited a ton of my grandmother's handwritten recipes and it was a great treasure (and a relief) to have them all logged in this cookbook.  No, this is not one of grandma's recipes, it is actually cousin Brenda's!  She is a fan of the Kozi Kitchen and a wonderful person, not to mention a dear first cousin to my mom.  So here's a shout out to YOU, Brenda, I never told you that I've been making these wonderfully simple pepperoni rolls for years now!  Thanks for putting it in the cookbook - actually, thanks for putting the whole cookbook together for all of us!

Ingredients:
  • 1 package frozen rolls (any count will do, just as long as you have enough for your fam).
  • 1 large bag mozzerella cheese
  • 1-2 packages pepperoni
  • 1 6-oz. can Italian tomato paste
Directions:

  1. Spray 2-4 cookie sheets with cooking spray, depending on how many rolls you will use.
  2. Set rolls on cookie sheets to thaw, approximately 30-45 minutes.
  3. Set the cheese and pepperoni each out in seperate bowls.
  4. Once thawed, spread out one roll at a time, holding it flat with your fingers spread apart.
  5. Use your free hand to sprinkle about 2 Tbsp. cheese on roll.
  6. Top with 3-4 slices pepperoni.
  7. Stretch one side of roll over to meet the other side and pinch edges together, taking care to tuck pepperoni inside (if it sticks out, the edges with come apart).
  8. Place rolls about 2 inches apart - you can get three rolls of three on each sheet.
  9. Cover with saran wrap sprayed on one side with cookie spray.
  10. Let rise about 1 1/2 to 2 hours.
  11. Bake at 375 degrees for 10 minutes.
  12. Combine tomato paste and 1/2 Tbsp. brown sugar and 1/4 cup of water for marinara sauce.
I usually make 27 at a time - that way we have enough for lunch the next day...just barely!

                                                  FRESHLY ROLLED ROWS


THEY'RE RISING!